Visit the Home,
            Kitchen and Lawn
            Christmas Corner
Showing posts with label beverages. Show all posts

Canning Apple Cider

canned apple cider canned apple cider (photo by jhy)
You will need: apple cider
quart canning jars
lids and rings
canner
jar lifter
funnel
paper towel
utensils

Canning apple cider is one method to preserve the goodness of cider all winter. The ones I canned have a small amount of floating "stuff" on top, but I can easily strain that out when they are opened. It's the result of not skimming the foam quite completely enough.

Prepare canning jars by washing and sterilizing. Then fill with hot apple cider leaving 1/2 inch headspace.

Follow general directions for hot water bath canning, and process for 20 minutes.

Remove from water, cool, remove rings, label and store.


Pasteurizing Fresh Apple Cider


apple cider at 180 degrees apple cider at 180 F (photo by jhy)
You will need: fresh homemade apple cider
large kettle
jelly thermometer

If:
  • you have concerns about your fresh cider being safe
  • you want to store it for a week or so
  • you plan to can the cider
you need to pasteurize it.

This simply means to raise the temperature high enough to kill most bacteria. It is not necessary to boil it, as this can change the flavor of some foods (for example, pasteurized milk is not boiled). The critical temperature is 180 degrees F (82 degrees C).

Put the cider in a large kettle, and clip a jelly thermometer on the side. Be sure that the bulb of the thermometer does not rest on the bottom of the pan. At least an inch clearance is good.

Heat the cider over medium high heat until the correct temperature is reached. Skim off the foam with a metal spoon. If you are going to can it, pour immediately into hot glass jars. If you are going to store it, you may need to let it cool. Particularly if you are putting it in plastic containers.


No Mess Grape Juice

homemade grape juice jars of juice just after processing (photo by jhy)
You will need:
Wild (or domestic) grapes
sugar (and optionally, substitute)
quart canning jars
lids, rings
canner
measuring cup
pans, utensils, etc

This method of making juice does not result in a beverage you can drink immediately, but it's incredibly easy. You have to wait a few months to drink the juice. I can hardly describe how wonderful wild grape juice is... it's like stepping into the autumn woods in mid-winter every time you take a sip.

A friend told me about this method. I've tried it with several different kinds of fruit, but this post will focus on grape. The great advantage is that you don't have to squeeze and strain grape juice which can stain things very badly.

Wash and sterilize as many quart jars as you think you will need. You can cover with a clean towel and let them rest until you have the grapes ready.

The part of this job that takes a lot of time is taking the small, wild grapes off the stems. Wash the grapes- it's easiest to do this while they are still in bunches. The main things to watch for on wild grapes are mold or spider webs. You'll need one cup of clean grapes for each quart. OK, your fingers will get purple doing this, but it's nothing like the mess of boiling grapes and squeezing the liquid through a jelly bag.

grapes and sugar in canning jar grapes, sugar and sugar substitute in a quart jar (photo by jhy)
Set water to boil- enough to fill all the jars you plan to use. Then, in each quart jar put 1 c of grapes and 1/2 c of sweetener. This can be all sugar, or half sugar and half substitute. I have not tried it with all sugar substitute, but it would probably work since there is no texture issue in this recipe as there is with baking.

Fill jars with boiling water, leaving 1/2 inch headspace. Clean rim, put on lids and rings. Process 10 minutes in boiling water bath. See basic instructions for hot water bath canning.

homemade grape juice after storing juice that's been in the pantry for a year (photo by jhy)
The just-processed juice will be very pale. The picture doesn't show it very well, but if you look at the left-most jar in the front row (top picture), you can pretty much see how translucent it is. When the jars have cooled, remove rings and place the juice in a pantry or somewhere to store for at least three months before opening. Over this time, the juice will develop. When you do open the jars, strain and remove the fruit. The juice is then ready to drink.


Fresh Apple Cider- No Press Needed


glass of apple cider fresh apple cider (photo by jhy)
You will need:
apples
food grinder or processor
cheesecloth or jelly bag
large bowl, pans, etc
sieve
jar or jug for storage

You can easily make small batches of fresh apple cider with no expensive press, and no special equipment.

We aren't big cider drinkers, but I do like a glass or two in the fall, and I hate paying grocery store prices when we have lots of scabby, less-than-perfect apples in the aged orchard we own. But, I thought you had to have a press to make cider, and those cost hundreds of dollars. Was I ever wrong!

This is exceptionally easy, and for families that aren't trying to produce a 55-gallon drum full of cider, it's not even very time consuming.

grinding apples to make cider grinding apples to make cider (photo by jhy)
Use the grinder or processor to make a mash of the apples. The great thing about cider is that you can use bruised apples, drops, damaged or insect bitten apples. Don't peel or remove the stems or anything. I did cut them into quarters just to make it easier to get them started in my Universal grinder. I used the smallest cutting wheel that is not the nut butter wheel.

There is no reason you need to measure anything at all for this process, but I did, just to get an idea of how much cider I was getting in relation to the ground up apples. From a quart of ground apples I got 2 cups of cider. This would vary a lot depending on the juiciness of the fruits, but at least it's a ball park figure.
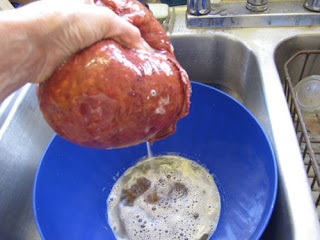
squeezing apple cider in a jelly bag squeeze the cider through a jelly bag (photo by jhy)
Take a pile of the ground apples and stuff it into a jelly bag or wrap in several layers of cheescloth. Do this over a large bowl, because the juice will begin to flow immediately. With clean hands squeeze the bag until you can't get any more juice out of the apple mash.

Dump the now-dry apple leavings into the compost.

strain the apple cider strain the apple cider (photo by jhy)
Because my jelly bag has some holes, I took a couple of extra seconds to run the fresh cider through a sieve, just to strain out any lumps that might have escaped while I was squeezing.

Put the cider in a clean jar or jug and store in the refrigerator. This won't keep as well as the pasteurized cider they sell at the store, so be sure to either freeze or use it soon.

I wish I had known this 30 years ago because this is a great project to do with kids, especially with a hand food grinder. I would recommend doing it outside with young helpers, though, because it was pretty messy, even with just me doing it. I would certainly have done this with my Cub Scout den. In an hour, working alone, I made more than 2 quarts of cider. A group of kids grinding and squeezing could get completely sticky and satisfied at a job that would produce food they could consume right away and even take some home.

I'm pretty sure this discovery is going to make my top 10 list of new finds for 2011!


VISIT MY OTHER BLOGS