Visit the Home,
            Kitchen and Lawn
            Christmas Corner
Showing posts with label pears. Show all posts

Autumn Cobbler


dish of autumn cobbler dish of autumn cobbler with whipped topping
(photo by jhy)
You will need:
For the Filling:
  • 3 c sliced apples
  • 3 c sliced pears
  • 3 c halved and seeded grapes (any will do, but Concord is divine)
  • 1/4 c flour
  • 1 c brown sugar
  • 1 t cinnamon
  • 1 T orange juice
For the Topping:
  • 2 c flour
  • 2 t baking powder
  • 1/2 t salt
  • 1/2 c sugar
  • 2 eggs
  • 1/2 c milk
  • 1/2 c butter or margarine (melted)
  • 2 t fresh grated orange rind
9x13 baking pan bowls measuring cups, spoons, scraper etc. We love this dessert. However, it's not a low-calorie treat. The part we love most is the filling, so I'm going to work on a different topping. You could even fix the fruit alone as a compote, and use half sugar substitute. You can easily cut this in half for an 8x8 pan. I have made it with several kinds of grapes. Our favorite, by far, is Concord. Although these do have seeds you have to remove, the flavor is amazing. It takes some prep time to cut the fruits, and baking time is a total of one hour. Sometimes I forget to buy the orange. You can leave it out without dire consequences.
autumn cobbler prepared fruits autumn cobbler prepared fruits (photo by jhy)
Prepare the fruit and mix together in a large bowl with the flour, brown sugar, cinnamon and juice.
autumn cobbler filling autumn cobbler filling, before baking (photo by jhy)
Pour into greased 9x13 pan. Bake at 425 F for 30 minutes Meanwhile, mix the dry ingredients for the topping. In a separate bowl combine the liquid ingredients, mixing to combine. Pour the liquid into the dry ingredients and stir well. When the fruit is cooked, remove from oven and spoon the topping over the fruit. Bake an additional 20-30 minutes until golden.
autumn cobbler in the pan autumn cobbler in the pan (photo by jhy)
Serve hot or cold. Whipped topping or ice cream is great with this. You can cut into any serving size you want, but we find that 12 portions is about right for adults.

Pear Almond Bread- Good for Dessert


pear almond bread pear almond bread (photo by jhy)
You will need:
    1 1/2 c. chopped pears (about 1/2 inch cubes)
  • 1 c. sugar OR 1/2 c sugar and 1/2 c sugar substitute
  • 1/4 c. vegetable oil
  • 2 eggs OR 1/2 c Egg Beaters™
  • 1/2 c. plain lowfat yogurt
  • 1 t. vanilla
  • 1 t. almond extract
  • 1 1/2 c. white flour
  • 1/2 c. whole wheat flour
  • 1 t. baking soda
  • 1/2 t. salt
  • 1/4 t. cinnamon
  • 1/4 t. nutmeg
  • 1/2 c. sliced or slivered almonds
  • 1/2 t. grated lemon peel
a medium bowl measuring cups & spoons spoons, fork, whisk, scraper 9 x 5 inch (or equivalent) loaf pan wax paper shortening to grease pan This is one of our very favorite quick breads and it uses quite a few pears. The pears remain in chunks throughout the bread after baking, so it is very moist. In fact, it will begin to mold in about an instant, so it's good to either eat it right away or freeze. More on that at the end. Combine the sugar (and substitute), oil and yogurt in a bowl and beat or whisk. Add eggs (or substitute) one at a time and beat well after each. Mix in the extracts. Add dry ingredients (sift if you want, but I never do) and mix. Add pears, almonds, and lemon peel (you can leave this out) and mix thoroughly. Prepare loaf pan by greasing the inside, line long sides and bottom with a length of wax paper, and grease the paper. This bread really likes to stick to the pan, so it's worth it to take time to do this.
pear almond bread batter pear almond bread batter in lined loaf pan (photo by jhy)
Spoon into loaf pan, and level somewhat. Bake 1 hour at 350 F. Cool slightly, then remove from pan to complete cooling. I slice this into 16 slices, and with the healthier substitutes, each slice is about 185 calories. It's a fairly sweet bread, because pears are just very sweet, so we like to eat it as a dessert. Because it molds so fast, I slice it, accordion fold a strip of wax paper between the slices, and freeze it in double bags or a bag and container. Then it's easy to pull out one slice at a time. I actually like to eat it when it's still partially frozen. Yummy! Excellent with coffee or tea which balances the sweetness somewhat.

How to Cut Perfect Pear Halves


You will need:
pears with no deep blemishes or odd shapes
sharp knife

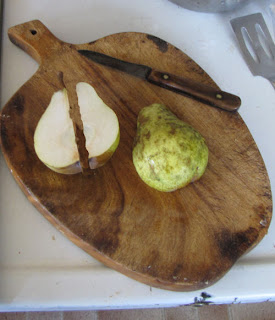
It's not too difficult to prepare perfect pear halves for salads, canning or freezing. It's really just a matter of practice and getting a feel for how deep to cut into the pear. Watch the video for a demonstration.


Dehydrated Pear Pieces


dehydrated pear bits in a bag dehydrated pear bits ready for storage (photo by jhy)
You will need:
dehydrator
pears
knife

Dehydrating bits of pear for use over the coming winter is really my favorite thing to do with too many pears. Since these keep very well, at least two years with no changes in color or texture (I think I've always used any that I had made within that time- they may keep longer), it's a perfect way to preserve the goodness.

I use these in the same way you might use raisins. I throw them on cereal, in salads, eat them plain, whatever. The texture is slightly chewy.

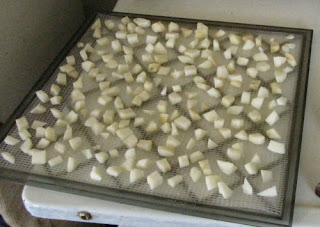
pear bits ready for dehydrating pear bits on the dehydrator tray (photo by jhy)
This works especially well for using pears that are less than perfect. If you are canning or freezing pear halves or quarters, you can always fill up a dehydrator tray with the sections that aren't good enough to give you those desired shapes. No waste!

Cut the peeled pears into bits, no more than 3/8 inch on a side. Preferably, if one side is a full 3/8 inch, the other dimensions might be 1/4 inch, but this isn't an engineering test. You just want to be sure that the pieces are thin enough that the centers will become leathery before the outside gets too dry. Do make sure that when you place them on the dehydrator trays that the pieces don't touch. This is important no matter what you are drying.

dehydrated pear bits in the dehydrator tray pear bits after dehydrating (photo by jhy)
Dry at 135 F for about 6-8 hours. The time is less important than how the bits look and feel. They should be shriveled and leathery all the way through. You don't want any soft, moist centers that still feel like raw pear. Those are what can cause mold and spoilage later on. You can see how much the pears shrunk.

The pieces tend to stick to the trays, but with these flexible nylon trays it's pretty easy to peel them off. For storage, I just put them in ziplock bags. If I'm going to put them in the pantry, I often double bag them to keep insects from boring in. When we were having some bad years with grain moths, I even vacuum bagged them.

Do label them, since they look exactly like apple bits later on!


Sugar-Free Pear and Crabapple Sorbet


sugar free pear crabapple sorbet sugar-free pear crabapple sorbet- notice the icy texture and how it will not hold a shape (photo by jhy)
You will need:
  • 2/3 c crabapple juice
  • 2/3 c sugar substitute such as Splenda or Stevia (I used Splenda)
  • 2 T. fresh lemon or lime juice
  • 4 c coarsely chopped pears
saucepan 8x8 metal cake pan with lid or foil blender or food processor spoons, spatulas, etc Now that I know what the texture of a sorbet should be like, I decided to adapt one of the recipes that uses a sugar substitute. I did like the flavor of the Crabapple-Pear Sorbet, but really hate using so much sugar. The results with the substitute were not very good.
sugar free pear crabapple sorbet sugar-free pear crabapple sorbet after blending and before freezing (photo by jhy)
In a saucepan, combine juice, sugar substitute and citrus juice. Bring to a boil and boil one minute. Cool to room temperature. Add the pears and puree in blender or processor until smooth. Pour into an 8x8 inch metal pan, cover and freeze at least 4 hours, or overnight. I let it freeze overnight.
sugar free pear crabapple sorbet sugar-free pear crabapple sorbet after freezing- you can only shave the surface, it's so icy (photo by jhy)
When I tried to dish this up with an ice cream scoop, it would not come out of the pan. It is full of ice crystals and was too hard to do anything but shave the surface. I let the pan sit out for 15 minutes and tried again. This time I was able to dish some up, but it does not hold the shape of the scoop at all. I even tried to press it into a ball, but it would not stick. The texture is much icier than the sugared sorbet, more like a thick slushie, although the flavor is good. This recipe has less crabapple and more pear, making it a little less tart, and a lighter pink color. The Sugar-Free Pear and Crabapple Sorbet would be a refreshing dessert on a hot day, but it's not nearly as good as the real thing.

Low-Fat Pear Oatmeal Muffins


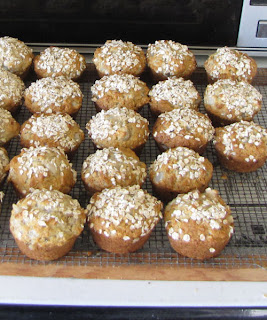
lowfat pear-oatmeal muffins pear-oatmeal muffins (photo by jhy)
You will need:
  • 1 c quick oats (divided)
  • 2 c white flour
  • 1/2 c whole wheat flour
  • 3/4 c sugar (or 3/8 c sugar and 3/8 c sugar substitute)
  • 1 T baking powder
  • 1 t baking soda
  • 1/2 t salt (you can reduce or eliminate this for low-salt diets)
  • 1/4 t ground cinnamon, mace or cardamom
  • 1/4 t ground allspice
  • 2 c chopped ripe pear (the smaller the pieces the better)
  • 3/4 c low-fat buttermilk or sour milk (you can add 1 T vinegar to regular milk to sour it- be sure to start it about 30 minutes ahead to give it time to sour)
  • 1/3 c lowfat cottage cheese
  • 1/4 c vegetable oil (we now use Smart Balance, but canola, or any vegetable oil works fine)
  • 1 T vanilla extract
  • 1 egg plus one egg white OR 3/8 c Egg Beaters™ or similar product
  • shortening or vegetable spray
bowls spoons, scrapers, etc. measuring cups muffin tins These muffins are really delicious. We've been making them for years, and after my husband had a heart attack, we made some substitutions to make them even more healthy. Preheat oven to 400F, and if you need to create the sour milk, mix the milk and vinegar and let it sit a few minutes. Prepare tins for 18 regular-size muffins. Combine 1/2 c of the oatmeal and all the dry ingredients in a large bowl. Add the pear pieces and mix gently to disperse and coat them. Mix the rest of the ingredients and stir or whisk till well-combined. Make a shallow well in the center of the dry ingredients. Add the liquid all at once, and stir just until the dry ingredients are moistened.
unbaked lowfat pear-oatmeal muffins fill muffin cups to the top (photo by jhy)
Spoon immediately into the prepared muffin tins. For this recipe you will fill the cups to the top (some muffins should only be filled to three-quarters). Sprinkle the remaining oatmeal over the muffins, and press in lightly. Bake for 18 minutes or until done. Muffins will be lightly golden. Remove from pans immediately and cool on a rack. These freeze well, if you can refrain from eating them all right away! With half sugar substitute, and lowfat milk, chottage cheese, etc. these muffins are only 120 calories each.

Pear and Crabapple Sorbet


a scoop of crabapple-pear sorbet a scoop of crabapple-pear sorbet (photo by jhy)

You will need:
  • 1 c crabapple juice
  • 3/4 c sugar
  • 2 c coarsely chopped pears
  • 2 T. fresh lemon or lime juice
  • salt
saucepan shallow container such as 8x8 cake pan blender or food processor 32 oz. freezer container with lid spoons, spatulas, etc Let me explain, right at the start, that this was an experiment. I had never tried this before. My results were good, but not spectacular. I'm not sure I like this enough to make it regularly, because it has to be made with sugar, rather than a substitute, so that bumps the calories. However, I might make it for a special dessert for company. There are sorbet recipes available which use Splenda™ instead of sugar. I have not tried any of them. I suspect they would need to be eaten immediately after preparation because the reason a sorbet works is that the large sugar molecules prevent the product from forming ice crystals and just becoming a popsicle. Anyway, this recipe was adapted from one that uses cranberry and pears, and it's the real deal... all sugar.
crabapple-pear sorbet before blending crabapple-pear sorbet after first freezing, before blending (photo by jhy)
Heat 1 c. crabapple juice with 1 1/4 c water, and 3/4 c sugar until the sugar is dissolved. Add pears and simmer until soft, about 5-10 minutes. Stir in the lemon juice and a pinch of salt. Allow the mixture to cool to room temperature, and then transfer it to a shallow pan. I used a square glass cake pan. Freeze for at least 6 hours, or overnight, until solid. Break this mixture into chunks and put in food processor or blender. I only have a blender, and even though it's pretty new and powerful, it wasn't very happy with trying to blend this. I used the puree setting. I probably should have only done portions at a time. When the whole mixture is completely smooth, return to a container with a lid and store covered in the freezer. The less air space there is in the container, and the sooner you eat this after the second freezing, the better it will be.
a soft scoop of crabapple-pear sorbet a soft scoop of crabapple-pear sorbet- before second freezing (photo by jhy)
The taste was excellent, with a nice balance between the tart crabapples and the sweetness. The texture was what you would expect of a sorbet- less icy than sherbet, but similar. I ate some as soon as it was blended. At this point, it was too soft to make into a ball, so was just a blob in the dish. After freezing for another day, I was able to roll up a ball with an ice cream scoop. However, it softened very quickly, and you can see in the top picture that the scoop is already losing its shape. That was after fewer than 2 minutes! Of course, sorbet does give you a frozen dessert option without the fat content. I'll have to try a sorbet with one of the recipes designed to use a sugar substitute, and compare the product. It looks like you could get about 6-8 scoops (servings) out of this recipe.

Quick and Easy Ideas for Serving Pears

If you have a pear tree, or access to one, you've already found that, in a good year, once the pears start to ripen there are more than you can deal with. Here are a few of my favorite fast, easy ways to serve pears that will help make the pile disappear.

Pears Plain
Just eat them out of hand! No need to peel if the skin is clear.

Pears in Lime Jello
This is a classic, but kids love it. (Adults do too!) You do have to remember to mix up the jello a few hours ahead of when you want to serve it. Prepare lime jello (regular or sugar free) according to the directions. Stir in pear chunks. If you stir them in when the jello is just starting to set, they won't float, but if the goal is to feed a hungry family... who cares!

pear with a pickled crabapple pear half garnished with a pickled crabapple (photo by jhy)
Pears with Garnishes
Plain pear halves can be served with just a bit of something to enhance the mild and sweet flavor of the pear. This can even be quite elegant if served on a lettuce leaf.
1. Add a pickled crabapple, and drizzle the pear with the red juice.
2. Add a strawberry and drizzle with chocolate sauce
3. Add a dollop of some jelly, preferably with a tart flavor- mint or crabapple
4. Drizzle with Nutella

Pears and Cheese
Pear chunks mixed with various kinds of greens and sprinkled with crumbles of a strong flavored cheese such as bleu cheese, Gorgonzola, Havarti, etc. make a fancy, but easy, salad.

Pears and Spreads/Dips
1. Pears smeared with peanut or other nut butters make a quick snack.
2. Cut pears into matchsticks and serve with bleu cheese dressing as a dip

Pear "Waldorf" Salad
I think pears go particularly well with pecans. Make a Waldorf style salad of firm pear chunks, pecans and celery. Mix with just enough mayonnaise or Miracle Whip to bind.


The Easiest Way to Peel Pears


pear halves cut pear in half and quarters lengthwise (photo by ory)
You will need:
pears
sharp paring knife
items for whatever you want to do with the pears

Pears can seem quite difficult to peel and core because of their odd shape. This method is the quickest I have found to peel pears, assuming that I don't want to end up with perfect halves. That requires a different technique.

First of all, choose the pear. If you've gotten your pears from an abandoned tree, there are likely to be a lot of imperfect ones. The one in the picture above is quite regular, without insect damage. I chose that for the pictures, but you can use this same basic idea even if the pear has odd contortions from insect stings. You'll just need to cut out any damaged sections. Cut the pear into lengthwise quarters.

coring a pear quarter remove the core (photo by ory)
Then hold the pear with the midline up and the base of the pear toward you.

Place the knife behind the stem, or if the quarter does not contain the stem, behind the hard, cord-like rib which will lie on the midline. With one motion cut that out, and then slice deeper as you reach the section containing the seeds to remove that part of the core. Bring the cut back to be more shallow as you approach the blossom end, and cut off that end too.

peeling a pear quarter remove the peel (photo by ory)
Turn the pear quarter over, and remove the peel with a shallow cut behind the skin. You can accomplish this with very little waste with a sharp knife and a bit of practice.

This will leave you with a long, narrow slice of peeled pear. That is, if you started with a nicely shaped pear. But even if there was a bad spot or oddly-shaped place, you can still salvage as much good fruit as possible with this method, and the core isn't too difficult to remove.


Then you can cut the good portion of the pear into whatever size chunks you desire.

Don't forget to compost the waste!

Finding Free Pears- Bartlett


Bartlett Pear Tree Bartlett pear tree (photo by jhy)
You can always buy pears, but the point of this blog is to be able to find free food. You have a good chance of finding some abandoned pear tree in an old farmyard if you keep your eyes open.

There are several kinds of old fashioned pears that were often planted at homesteads, now called "heritage" varieties. In the northeastern US, the most common are Bartlett and Seckel. This post will talk about Bartletts. In Europe, these are called Williams pears. The Bartlett has a shape that has come to be the definition of pear-shaped. Not all pears actually have this shape, but this one does.

Look for small (15-20 feet) trees that don't spread out into much of a crown. You will see bright white blossoms in May. Pear twigs are very recognizable, looking stubby and awkward. I'll add a picture when the leaves are off the trees. They were often planted in pairs for cross-pollination.

Bartlett Pears Bartlett pears (photo by jhy)
The fruits grow along the branches, and will be ready to harvest in early September. Each pear is 3-5 inches in length and about 2- 2.5 inches in diameter. Harvest before the first frost.

Bartlett Pears should be harvested while still green. I shake the trees every day and pick up the ones that have fallen. That way, I'm not breaking off a lot of twigs. Then allow them to ripen after picking. You may read that they are ripe when they are yellow, but if you wait to use them till they are yellow, they will be pretty much over-ripe. There is a window of about one day when they are greenish-yellow, and still somewhat firm, but soft when you cut into them. This is perfect for canning, drying, or even eating.

VISIT MY OTHER BLOGS