Visit the Home,
            Kitchen and Lawn
            Christmas Corner
Showing posts with label apples. Show all posts

Canning Apple Cider

canned apple cider canned apple cider (photo by jhy)
You will need: apple cider
quart canning jars
lids and rings
canner
jar lifter
funnel
paper towel
utensils

Canning apple cider is one method to preserve the goodness of cider all winter. The ones I canned have a small amount of floating "stuff" on top, but I can easily strain that out when they are opened. It's the result of not skimming the foam quite completely enough.

Prepare canning jars by washing and sterilizing. Then fill with hot apple cider leaving 1/2 inch headspace.

Follow general directions for hot water bath canning, and process for 20 minutes.

Remove from water, cool, remove rings, label and store.


Pasteurizing Fresh Apple Cider


apple cider at 180 degrees apple cider at 180 F (photo by jhy)
You will need: fresh homemade apple cider
large kettle
jelly thermometer

If:
  • you have concerns about your fresh cider being safe
  • you want to store it for a week or so
  • you plan to can the cider
you need to pasteurize it.

This simply means to raise the temperature high enough to kill most bacteria. It is not necessary to boil it, as this can change the flavor of some foods (for example, pasteurized milk is not boiled). The critical temperature is 180 degrees F (82 degrees C).

Put the cider in a large kettle, and clip a jelly thermometer on the side. Be sure that the bulb of the thermometer does not rest on the bottom of the pan. At least an inch clearance is good.

Heat the cider over medium high heat until the correct temperature is reached. Skim off the foam with a metal spoon. If you are going to can it, pour immediately into hot glass jars. If you are going to store it, you may need to let it cool. Particularly if you are putting it in plastic containers.


Low Fat Apple Crisp


apple crisp apple crisp (photo by jhy)
You will need:
  • 7 c apple slices
  • 1/3 c sugar (or sugar substitute)
  • 2 T flour
  • 2 t cinnamon
  • 1 c quick rolled oats
  • 1/4 c brown sugar
  • 1 t cinnamon
  • 1/4 c oleo (margarine)
9x13 inch pan bowls spoons, scraper, etc sharp knife This apple crisp is delicious, having all the goodness of apple pie without the calories of the pie crust. It's very basic, and you probably have all the ingredients on hand if you bake regularly. I made the mistake of using oats that were not "quick" the first time I made it. They do not soften, despite the long baking time, and the topping was very crunchy. I didn't mind, but hubby did not like that. You could add some nutmeg too, if you like.
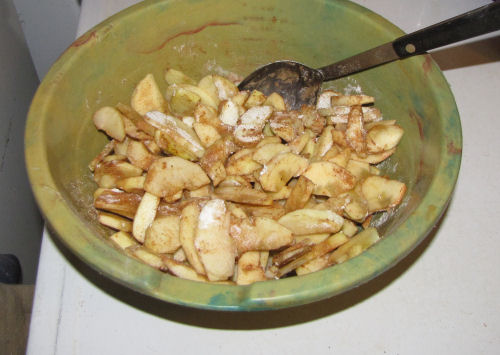
apples mixed for crisp apples and spices mixed (photo by jhy)
Peel, core and slice apples till you have 7 cups. Toss them with the white sugar (or substitute), flour, and 2 t of the cinnamon. Spread this mixture in the bottom of a baking pan. Cut together the oats, brown sugar, 1 t cinnamon, and the oleo, until crumbly. Sprinkle this on top of the apples. Bake at 350 F for 50-60 minutes. This is great with ice cream, whipped topping, yogurt, or just plain.

Basic Traditional Apple Pie- 10 inch


homemade apple pie traditional apple pie (photo by jhy)
You will need:
  • 7 c apple slices (10-20 apples, depending on size and damage)
  • 1/2 c flour
  • 1/2 c sugar (or half sugar substitute)
  • 2 T brown sugar
  • 1 t cinnamon
  • 1/2 t nutmeg
  • butter or margarine
  • pie crust for a 10" pie, double crust- ready made or your favorite recipe
10-inch pie plate rolling pin sharp knife large bowl spoons, scrapers, etc Preheat oven to 375 F When you are grazing the ditches, you don't ask questions about which variety of apples make the best pie. You just make the pie. That said, if your apples are really sweet they are going to make a really sweet, mushy pie. Crisp and tart apples will be best. This recipe has no frills. It's just a basic, all-American, traditional apple pie. Eat it for dessert, or for breakfast!
unbaked homemade apple pie basic apple pie ready for the oven (photo by jhy)
I rarely make 9-inch pies. If I am going to enough work to make a pie, I make one that will last a few days. However, I've basically found that a 10 inch pie will hold almost twice as much fruit as a 9-inch pie. Peel, core and slice apples about 1/8 inch thick, until you have 7 cups of fruit. Add flour, sweeteners and spices. Stir to coat. Put bottom crust in pie pan, fill with fruit mixture. Dot with butter or margarine
homemade apple pie slice of apple pie with whipped topping (photo by jhy)
Add top crust and seal. Be sure to cut a few vents in the top crust. Bake at 375 F for one hour. A slice of 10" pie (made with 1/4 c. sugar and 1/4 c sugar substitute), and equal to 1/10 of the pie has about 375 calories.

Low-Fat Apple Bread


slices of apple bread slices of apple bread (photo by jhy)
You will need:
  • 2 c chopped apples
  • 1/2 c chopped nuts (I used walnuts)
  • 1/4 c oil
  • 1/2 c yogurt
  • 1/3 c honey
  • 1 egg (or 1/4 c egg substitute)
  • 1 t vanilla
  • 1/2 t nutmeg
  • 1/2 t cinnamon
  • 1/2 t salt
  • 1/2 t soda
  • 1 t baking powder
  • 1 c white flour
  • 1 c whole wheat flour
9x5 loaf pan or equivalent bowl measuring cups sharp knife spoons, scrapers, etc This bread is less sweet than the Pear-Almond Bread. I really like them both. I think this apple bread is good for breakfast, or to go with a vegetable-based soup. Peel and chop the apples. I usually make the chunks 1/4- 3/8 inch on a side- something between what I would call fine and coarse. Prepare the pan by greasing, lining with wax paper and grease again. Breads with large chunks of fruit tend to stick to the pan, and the extra minute it takes to line with wax paper is well worth it. Mix the wet ingredients and beat well. Add the dry ingredients and stir just until they are all moistened. Add the apples and nuts and stir in. The batter will be very thick.
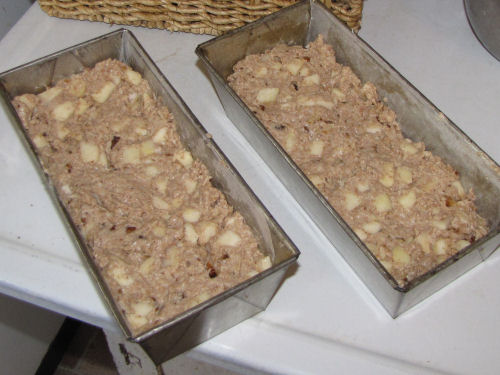
unbaked apple bread in a loaf pan spread the dough in a loaf pan and level (photo by jhy)
Spread in a loaf pan. (I doubled the recipe, which is why there are two pans in the picture). You will need to level the dough. Bake at 350 degrees for 50-60 minutes until a toothpick or tester comes out clean. Remove from pan and peel the wax paper immediately. Cool before slicing.
You may be able to tell that my pans are not 9x5. They are approximately 10x4, and have no brand label, but they make a nicely shaped loaf. The only ones of a comparable size that I find on line are these ridiculously priced ones. What can I say? I really prefer this shape for quick breads because the slices are more nearly square instead of low rectangles. Glad I found these somewhere in my past!

Making Applesauce with No Food Mill

apples cooking in a pan pan full of apple chunks (photo by jhy)
You will need:
apples
pan with a tight lid
sharp knife
potato masher or strong fork

This is actually my preferred method of making applesauce. Since almost all the apples I use are free, low-quality apples, I would have to do a lot of trimming anyway, and I think it's just easier to peel and core them as well. The food mill is a lot of mess (in my opinion).

Peel, core, and remove bad spots from the apples. There is no set amount- it makes no difference, but you wouldn't want to fill a pan to the very top. You need some expansion and stirring space for cooking.

Place the apple chunks (I cut apples into quarters if small, or eighths if larger) in the pan, and add just a skim of water to the pan. Really, just a tiny bit. In this 6-quart saucepan I used maybe a quarter-cup of water. This is just enough to get the juices to start flowing in the apples with out burning.

Put the cover on the pan and place over the lowest heat possible. Check in about 5 minutes. Remove the cover, and the apples should have started creating their own liquid. At this point you can raise the heat a little bit, but keep it no higher than medium. Leave the lid off, and continue cooking until the apples are soft. Stir occasionally to redistribute the apples at the top down into the liquid.

When the apples are soft- usually in 5-10 minutes, use a potato masher to turn them into sauce. You can leave it as chunky as you like.

homemade chunky applesauce homemade applesauce- this batch is quite chunky (photo by jhy)
You can't get all the chunks out with this method. However, my husband likes extra-smooth applesauce, so I usually put some in the blender for him.

The flavor of the applesauce will depend on the variety of apples used. It's up to you- sweet or tart- or just whatever you can get! Sweeten to taste and/or add a dash or cinnamon or nutmeg.


Autumn Cobbler


dish of autumn cobbler dish of autumn cobbler with whipped topping
(photo by jhy)
You will need:
For the Filling:
  • 3 c sliced apples
  • 3 c sliced pears
  • 3 c halved and seeded grapes (any will do, but Concord is divine)
  • 1/4 c flour
  • 1 c brown sugar
  • 1 t cinnamon
  • 1 T orange juice
For the Topping:
  • 2 c flour
  • 2 t baking powder
  • 1/2 t salt
  • 1/2 c sugar
  • 2 eggs
  • 1/2 c milk
  • 1/2 c butter or margarine (melted)
  • 2 t fresh grated orange rind
9x13 baking pan bowls measuring cups, spoons, scraper etc. We love this dessert. However, it's not a low-calorie treat. The part we love most is the filling, so I'm going to work on a different topping. You could even fix the fruit alone as a compote, and use half sugar substitute. You can easily cut this in half for an 8x8 pan. I have made it with several kinds of grapes. Our favorite, by far, is Concord. Although these do have seeds you have to remove, the flavor is amazing. It takes some prep time to cut the fruits, and baking time is a total of one hour. Sometimes I forget to buy the orange. You can leave it out without dire consequences.
autumn cobbler prepared fruits autumn cobbler prepared fruits (photo by jhy)
Prepare the fruit and mix together in a large bowl with the flour, brown sugar, cinnamon and juice.
autumn cobbler filling autumn cobbler filling, before baking (photo by jhy)
Pour into greased 9x13 pan. Bake at 425 F for 30 minutes Meanwhile, mix the dry ingredients for the topping. In a separate bowl combine the liquid ingredients, mixing to combine. Pour the liquid into the dry ingredients and stir well. When the fruit is cooked, remove from oven and spoon the topping over the fruit. Bake an additional 20-30 minutes until golden.
autumn cobbler in the pan autumn cobbler in the pan (photo by jhy)
Serve hot or cold. Whipped topping or ice cream is great with this. You can cut into any serving size you want, but we find that 12 portions is about right for adults.

Fresh Apple Cider- No Press Needed


glass of apple cider fresh apple cider (photo by jhy)
You will need:
apples
food grinder or processor
cheesecloth or jelly bag
large bowl, pans, etc
sieve
jar or jug for storage

You can easily make small batches of fresh apple cider with no expensive press, and no special equipment.

We aren't big cider drinkers, but I do like a glass or two in the fall, and I hate paying grocery store prices when we have lots of scabby, less-than-perfect apples in the aged orchard we own. But, I thought you had to have a press to make cider, and those cost hundreds of dollars. Was I ever wrong!

This is exceptionally easy, and for families that aren't trying to produce a 55-gallon drum full of cider, it's not even very time consuming.

grinding apples to make cider grinding apples to make cider (photo by jhy)
Use the grinder or processor to make a mash of the apples. The great thing about cider is that you can use bruised apples, drops, damaged or insect bitten apples. Don't peel or remove the stems or anything. I did cut them into quarters just to make it easier to get them started in my Universal grinder. I used the smallest cutting wheel that is not the nut butter wheel.

There is no reason you need to measure anything at all for this process, but I did, just to get an idea of how much cider I was getting in relation to the ground up apples. From a quart of ground apples I got 2 cups of cider. This would vary a lot depending on the juiciness of the fruits, but at least it's a ball park figure.
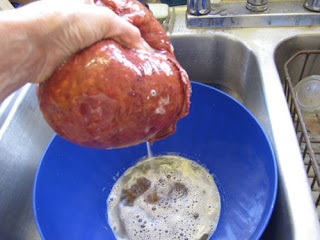
squeezing apple cider in a jelly bag squeeze the cider through a jelly bag (photo by jhy)
Take a pile of the ground apples and stuff it into a jelly bag or wrap in several layers of cheescloth. Do this over a large bowl, because the juice will begin to flow immediately. With clean hands squeeze the bag until you can't get any more juice out of the apple mash.

Dump the now-dry apple leavings into the compost.

strain the apple cider strain the apple cider (photo by jhy)
Because my jelly bag has some holes, I took a couple of extra seconds to run the fresh cider through a sieve, just to strain out any lumps that might have escaped while I was squeezing.

Put the cider in a clean jar or jug and store in the refrigerator. This won't keep as well as the pasteurized cider they sell at the store, so be sure to either freeze or use it soon.

I wish I had known this 30 years ago because this is a great project to do with kids, especially with a hand food grinder. I would recommend doing it outside with young helpers, though, because it was pretty messy, even with just me doing it. I would certainly have done this with my Cub Scout den. In an hour, working alone, I made more than 2 quarts of cider. A group of kids grinding and squeezing could get completely sticky and satisfied at a job that would produce food they could consume right away and even take some home.

I'm pretty sure this discovery is going to make my top 10 list of new finds for 2011!


VISIT MY OTHER BLOGS