Visit the Home,
            Kitchen and Lawn
            Christmas Corner

Savory Muffins (Greens & Pesto)

savory muffins with greens savory muffins with greens and pesto (photo by jhy)

You will need:
  • 3 cups flour
  • 1 T. baking powder
  • 1 t. salt
  • 3 eggs
  • 1/2 c. oil
  • 1/2 c. yogurt (at least)
  • 1 c. milk
  • 10 oz cooked greens (spinach, nettles, others) See Nettles
  • 1/2- 1 c. pesto See Garlic Mustard Pesto
  • 1 c. shredded cheese (cheddar, mozzarella, etc)
mixing spoon or fork
spatula
2 medium bowls
measuring cups & spoons
muffin pans for regular size (2 1/2 inch) muffins

Preheat oven to 350 degrees F.

Prepare 12 muffin cups. You can insert liners, but for less bread loss on the paper, try How to Bake Muffins that Won't Stick to the Pan (link coming soon).

In a large bowl, mix the dry ingredients.

In a separate bowl, beat the eggs, add oil, milk and yogurt and mix well. Add the squeezed out cooked greens (save the juice). If the liquid seems thick add in a little of the juice from the greens. This is where you have to do some guessing in this recipe because the amount of liquid in the greens, and the thickness of the pesto may require the addition of more liquid.


savory muffins with greens savory muffins ready to bake (photo by jhy)
Make a well in the dry ingredients and add the liquid all at once. Stir until thoroughly moistened, but the batter will still be lumpy. Over-mixing muffins will make them tough and dry. If the batter is really too stiff to stir, you can add more greens juice or yogurt, but don't stir excessively.

Finally, fold in the cheese and pesto until distributed.

Fill the 12 muffin cups. Bake for 20-25 minutes until tester or toothpick comes out clean. Remove from pans.


Garlic Mustard Pesto

garlic mustard pesto garlic mustard pesto (photo by jhy)


You will need:

One packed cup of clean garlic mustard leaves
1/4 cup chopped walnuts or pine nuts
1 clove garlic, peeled
1 cup common chickweed (Stellaria media) or fresh parsley leaves or 1 T dried parsley
1 cup olive oil
1/4 cup grated parmezan or romano cheese
salt to taste


garlic mustard leavesl garlic mustard leaves, harvested (photo by jhy)
Pick garlic mustard leaves, Alliaria petiolata. I filled a medium bowl with them, which packed nicely to just over a cup. Wash thoroughly.

Chop the nuts and garlic together. There is lots of leeway in this recipe. A food processor would be nice, but I don't have one. So I chopped these two things by hand to get them started. You will need some kind of processor or blender or even an immersion blender.

Then I used my immersion blender stick and just stopped it to clear the blade every few seconds. It worked fine. Put in a few leaves at a time until everything is coarsely chopped.
garlic mustard leaves packed in a cup one packed cup of garlic mustard leaves (photo by jhy)

Then I started adding the olive oil, and that made the blender stick happier. Blend until you like the consistency. I didn't even measure the oil, but just added some until I liked the texture.

garlic mustard pesto being blended the immersion blender chopped the leaves (photo by jhy)


Gathering Wild Leeks (Ramps)

growth habit of wild leeks wild leek growth habit (photo by jhy)

Wild leeks, Allium tricoccum, also known as ramps, appear early in the spring in April or May, about the same time of year as the hepatica and spring beauty bloom. You will find patches of them in the woods. They grow like this.

They don't have many look-alikes. Clintonia (bluebead) leaves are similar, but the tips of the Clintonia leaves are rounder. Leeks have purplish stems. And the clincher is, that if you break and crush a stem, it will smell like onion.

wild leeks wild leeks (photo by jhy)

You will need to dig up the plants. Usually, they will just break off if you try to pull them up, and you definitely want the bulbs. Once you have determined how deep you need to dig, just bring up a handful and knock most of the dirt off until you can wash them. You can carry them home in a paper or plastic bag.


To clean: Once they are thoroughly rinsed, I cut off the root ball (leaving the bulb, of course), and then just slide the outermost "skin" down over the bulb to remove any remaining dirt or residue.

wild leeks ready to take home wild leeks ready to take home (photo by jhy)


Potato and Wild Leek (Ramps) Soup

potato and wild leek soup potato and wild leek soup (photo by jhy)

There are literally hundreds of recipes on line for potato and onion/leek/ramp soup. I tried to keep this simple.

You will need:
a handful of wild leeks, which includes bulbs
(See Gathering Wild Leeks for tips on identifying and gathering leeks)
1 potato (about 8 ounces)
1 bullion cube- chicken or vegetable
1 T butter/oleo
1 T flour
1 c milk

Equipment:
2 saucepans (one about 2 qts. one smaller or a small frying pan)
spoon or spatula
knife

Prepare the leeks. After I brought mine home, I washed them, cut off the root ball, and then peeled down the outer skin of the bulb which removed any remaining dirt. After cleaning, I had 1.1 oz of leeks. Cut them into pieces- maybe 1/2 inch. Reserve a bit of the greens to dice for a garnish.

Dice the potato and boil in the larger pan with the cut up leeks, in at least 1 c. water and the bullion cube. Cook until soft.

potato and wild leek soup potato and wild leek soup (photo by jhy)

Meanwhile, make a white sauce. Heat the butter and add flour. Stir to make a roux, then gradually add milk. Cook and stir over low heat until thickened.

Add the white sauce to the vegetables. Turn off heat and blend with an immersion blender. Or you can blend with a regular blender or an egg beater. Or you can do it the really old-fashioned way by pressing the soft vegetables through a sieve. If you do this, wait to add the white sauce until after you've done this and returned the sieved vegetables to the cooking water.

Garnish with the remaining leek leaves.

This made about 3 cups- one hearty dinner serving, or 2-3 side servings. The onion flavor was present, but not strong. You could use more leeks.

It took about 20 minutes to make.


Autumn Olive, Orange, Poppyseed Muffins

crabapple pulp in a food mill glazed autumn olive, orange, poppyseed muffins
(photo by jhy)


You will need:
autumn olive berries, about one cup, washed, stems removed
2 1/4 c. flour
2 t. baking powder
1/2 t baking soda
1/2 t. salt
1/2 c. + 1 T sweetener (all sugar or part stevia, Splenda, etc)
2 eggs
1/2 c. oil
1/2 c. yogurt
grated zest of one orange
juice from that orange
1 t vanilla
2 T. poppy seeds

(for glaze: 1/2 c. confectioners sugar, part of the zest and juice, and 1/2 t. vanilla)

Equipment:
muffin tins for 12 muffins
wax paper, scissors and shortening; or muffin cup papers
sifter (optional)
bowl
whisk or fork
fine grater
manual juicer (or strong hands)

Preheat oven to 400 degrees F.

Prepare 12 muffin cups. You can insert liners, but for less bread loss on the paper, try [link coming soon].

Grate the outer orange rind to produce the zest, and then juice the orange.

Sift together, or thoroughly mix flour, baking powder, soda, and salt.
Whisk together the eggs and sugar (granulated sweetener).
Add oil, yogurt, 3 T orange juice, vanilla, poppy seeds, and all but 1 T of the grated zest to the eggs and sugar. Mix thoroughly.
Stir the berries into the liquid.

crabapple pulp in a food mill liquids mixed with berries added, but not yet stirred
(photo by jhy)
Add the dry ingredients all at once and fold together only until there are no more dry lumps (overmixing muffins will make them tough).


Spoon the mixture into 12 muffin cups. They will be full.

crabapple pulp in a food mill muffin cups will be quite full
(photo by jhy)

Bake for 12-15 minutes until inserted tester comes out clean, cool slightly and remove from pans.

Glaze if desired. Mix the reserved zest with the confectioners sugar, add vanilla and enough of the remaining just to make a soft glaze. Drizzle over warm muffins.


Spring Greens

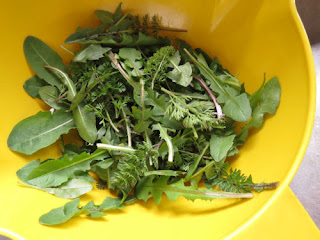
wild spring greens for salad dandelion and wild carrot greens (photo by jhy)

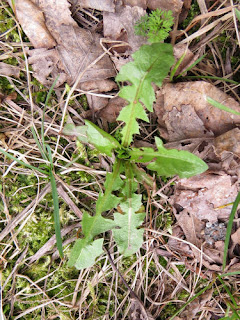
Early spring is the perfect time to augment your salad with wild greens. Even though hardly anything here has greened up yet, I found young dandelion and wild carrot (Queen Anne's lace) sprouts. The only tricky thing about any of this is to learn to identify the plants while they are still small and hiding in the grass or the leaf litter from the previous year. You want young leaves before they become bitter. Both are edible when mature, but the taste isn't as nice.

Common dandelion, Taraxacum officinale, is pretty familiar to most everyone.
dandelion sprouts young dandelion plant (photo by jhy)


Wild carrot, Daucus carota, is recognized by most people when it flowers, but the young leaves are quite distinctive. They have a definite carrot odor when broken.

wild carrot sprout young wild carrot plant (photo by jhy)


Collect them by simply breaking off the leaves. Plants growing near road edges will have more grit, but you'll want to wash the leaves anyway. Place in a colander and remove any grass, sticks, etc. Wash gently and shake or pat dry as desired.

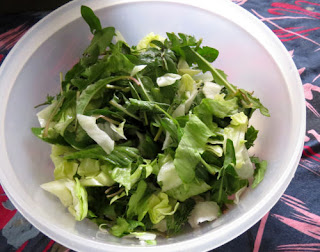
I like to mix them with regular lettuce to make a nice salad base, but if you collect enough, you don't need lettuce. The iceberg lettuce does ameliorate any bitterness of the wild greens.

wild salad greens mixed with lettuce dandelion and wild carrot greens mixed with lettuce (photo by jhy)


Milkweed Buds

milkweed buds milkweed buds ready to harvest (photo by jhy)

Milkweed buds can be harvested when they are still tight like little broccoli florets. Try to get them as early as possible when they have little color other than green. These will have the best flavor. The ones shown are probably as far along in terms of opening as you want (eating the flowers won't hurt you, but the flavor is different from the buds). Even if some of the flowers on a stalk have opened, there may still be buds near the top of a plant that will be fine to take. This is common milkweed, Ascelpias syriaca.

collected milkweed buds and leaves note the milky sap oozing from the cut ends (photo by jhy)

I just snip them off the plant with scissors. You can see that I've also taken some small leaves, which also taste great. The milky sap oozes out of the cut ends, and it is bitter, but cooking will eliminate that problem. Wash the scissors right away if possible, as that sap is like glue!

milkweed buds cooking cooked milkweed buds will turn bright green (photo by jhy)


Boil some water, with or without added salt as you wish, add the milkweed buds and boil gently for 2-3 minutes. They will turn bright green as they cook. Discard the cooking water as it will be bitter. If you are going to add the florets to a soup or stew, I suggest cooking them separately and adding at the last minute so that bitter sap will not leach into your broth.

milkweed buds served on a baked potato milkweed buds as a baked potato topping (photo by jhy)

You can see that tonight I'm using these as a topping for a baked potato, just like broccoli. Add any other toppings you like, or just use the greens. They can be eaten straight as a vegetable, or added to other dishes. The flavor is mild.


VISIT MY OTHER BLOGS